
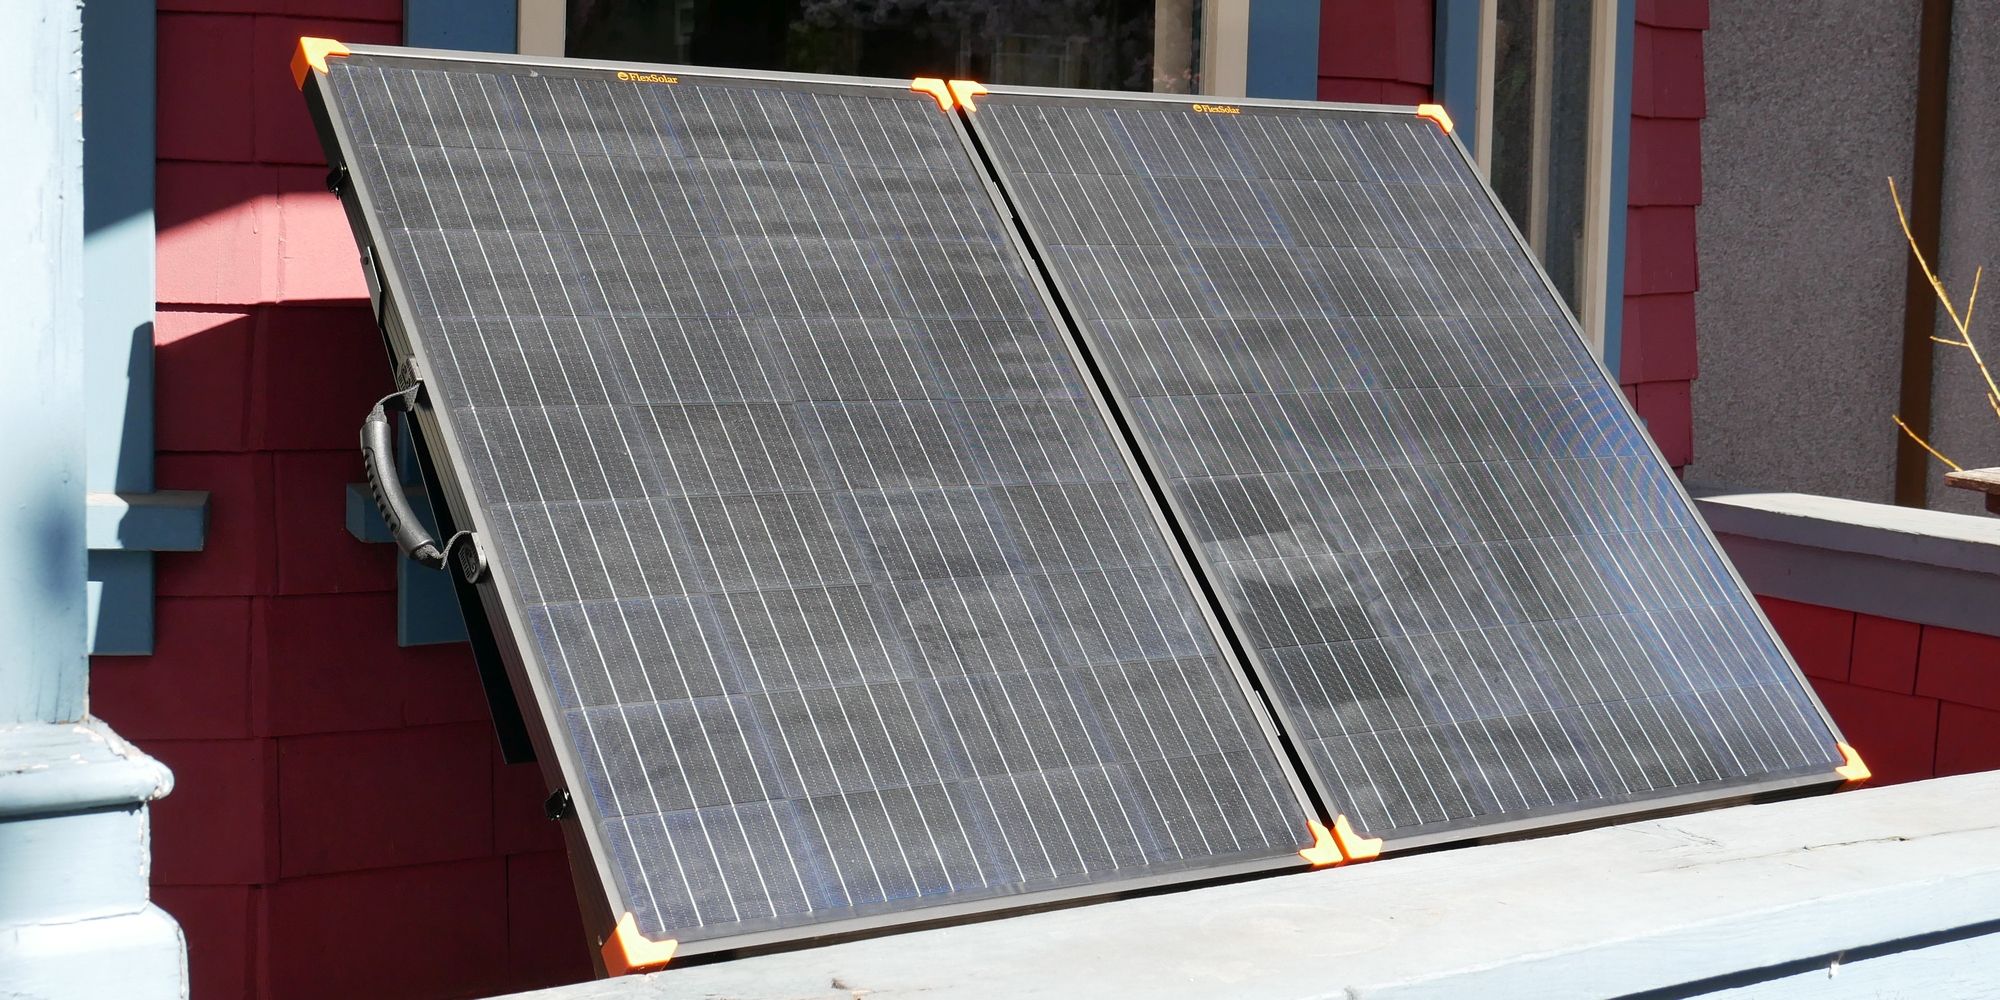
The FlexSolar 200W briefcase solar panel consists of two connected 100W panels that use monocrystalline cells. The included cables feature standard connectors. A pre-mounted solar charge controller optionally lets you charge a car or RV battery, while also powering up to two USB devices and running a load. Its efficient, durable, and versatile design makes the FlexSolar 200W briefcase solar panel great for at home and outdoor adventures alike.
- 200W power form monocrystalline cells with 21.5% conversion efficiency
- PWM solar charge controller pre-mounted
- IP65 water proof
- Brand: FlexSolar
- Type: Briefcase
- Power: 200W
- Voltage: Vmp 18.6V, Voc 22.8V
- Size: Unfolded: 55.2x36.5x1.3in (140.2x92.8x3.3cm)
- Weight: 35.76lbs (16.22kg)
- Ingress Protection Rating: IP65
- Price per Watt: ~$1.85
- Maximum Current: 10.8A
- Monocrystalline cells
- Portable briefcase-like design
- Solar charge controller built-in
- Great selection of cables included
- PWM instead of an MPPT solar charge controller
- Bulky
- Can only stand on a flat surface, no mounting options
When you're planning your next camping trip, consider how you'll keep the lights on, the fridge running, and your electronics topped up. A portable solar panel lets you harvest daylight while keeping your batteries topped up wherever you go.
We had a chance to review the FlexSolar 200W briefcase solar panel, which is essentially two connected 100W panels with a handle. It includes all the cables and fixtures needed to charge a power station, car battery, lights, or USB devices. But will it fit your needs? Let's find out.
What's in the Box
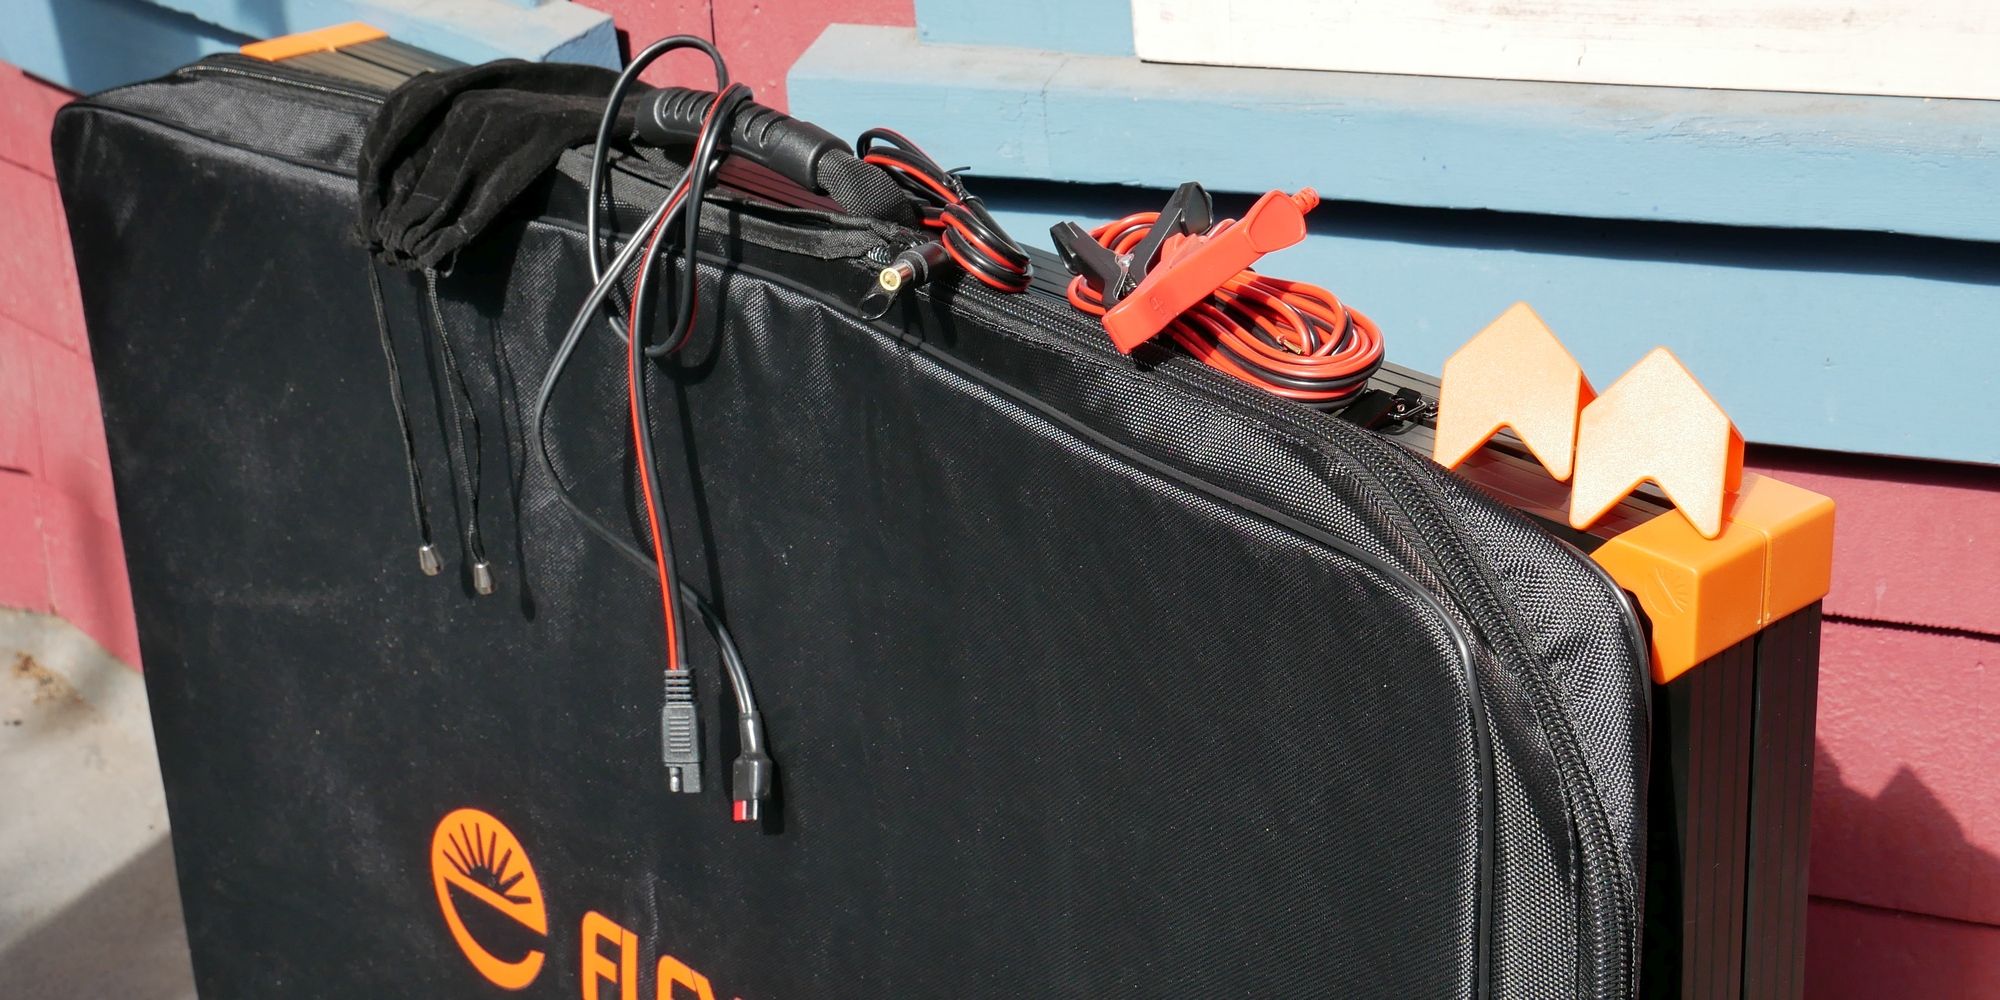
The FlexSolar 200W briefcase solar panel comes with the panel itself and the following accessories:
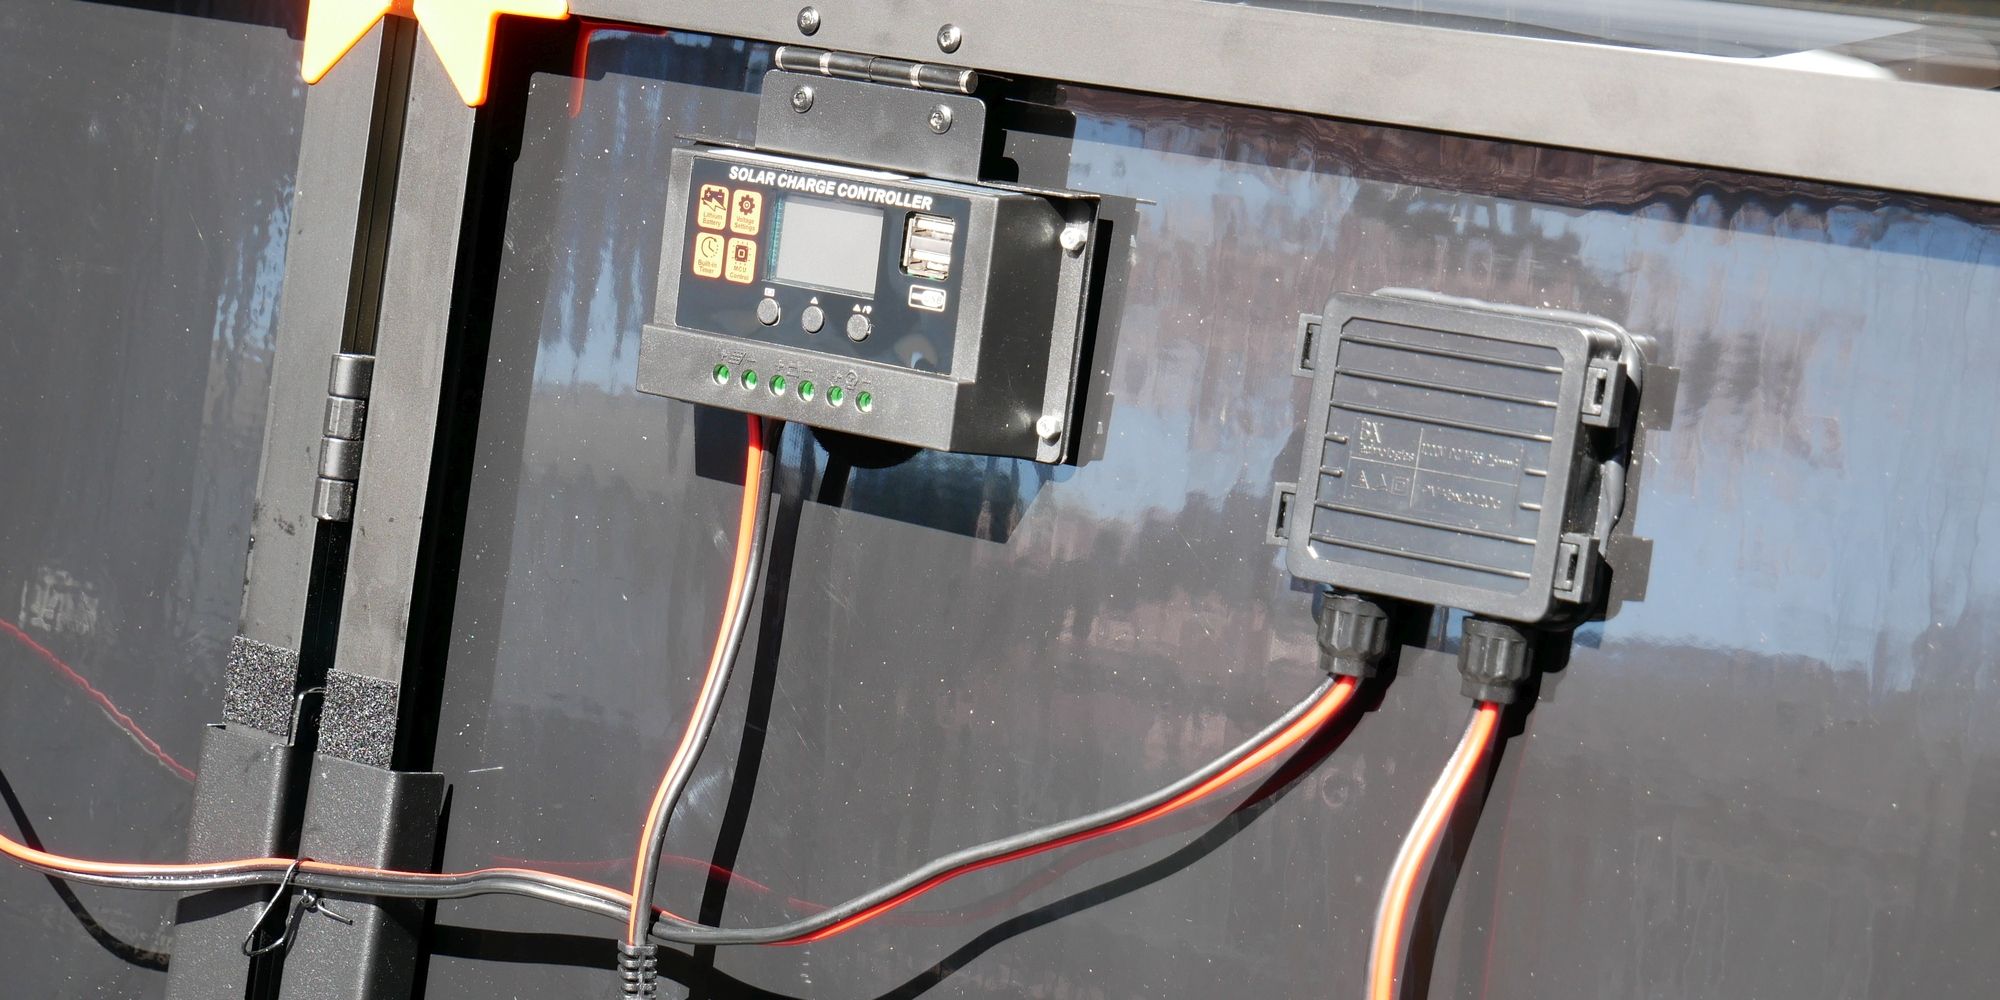
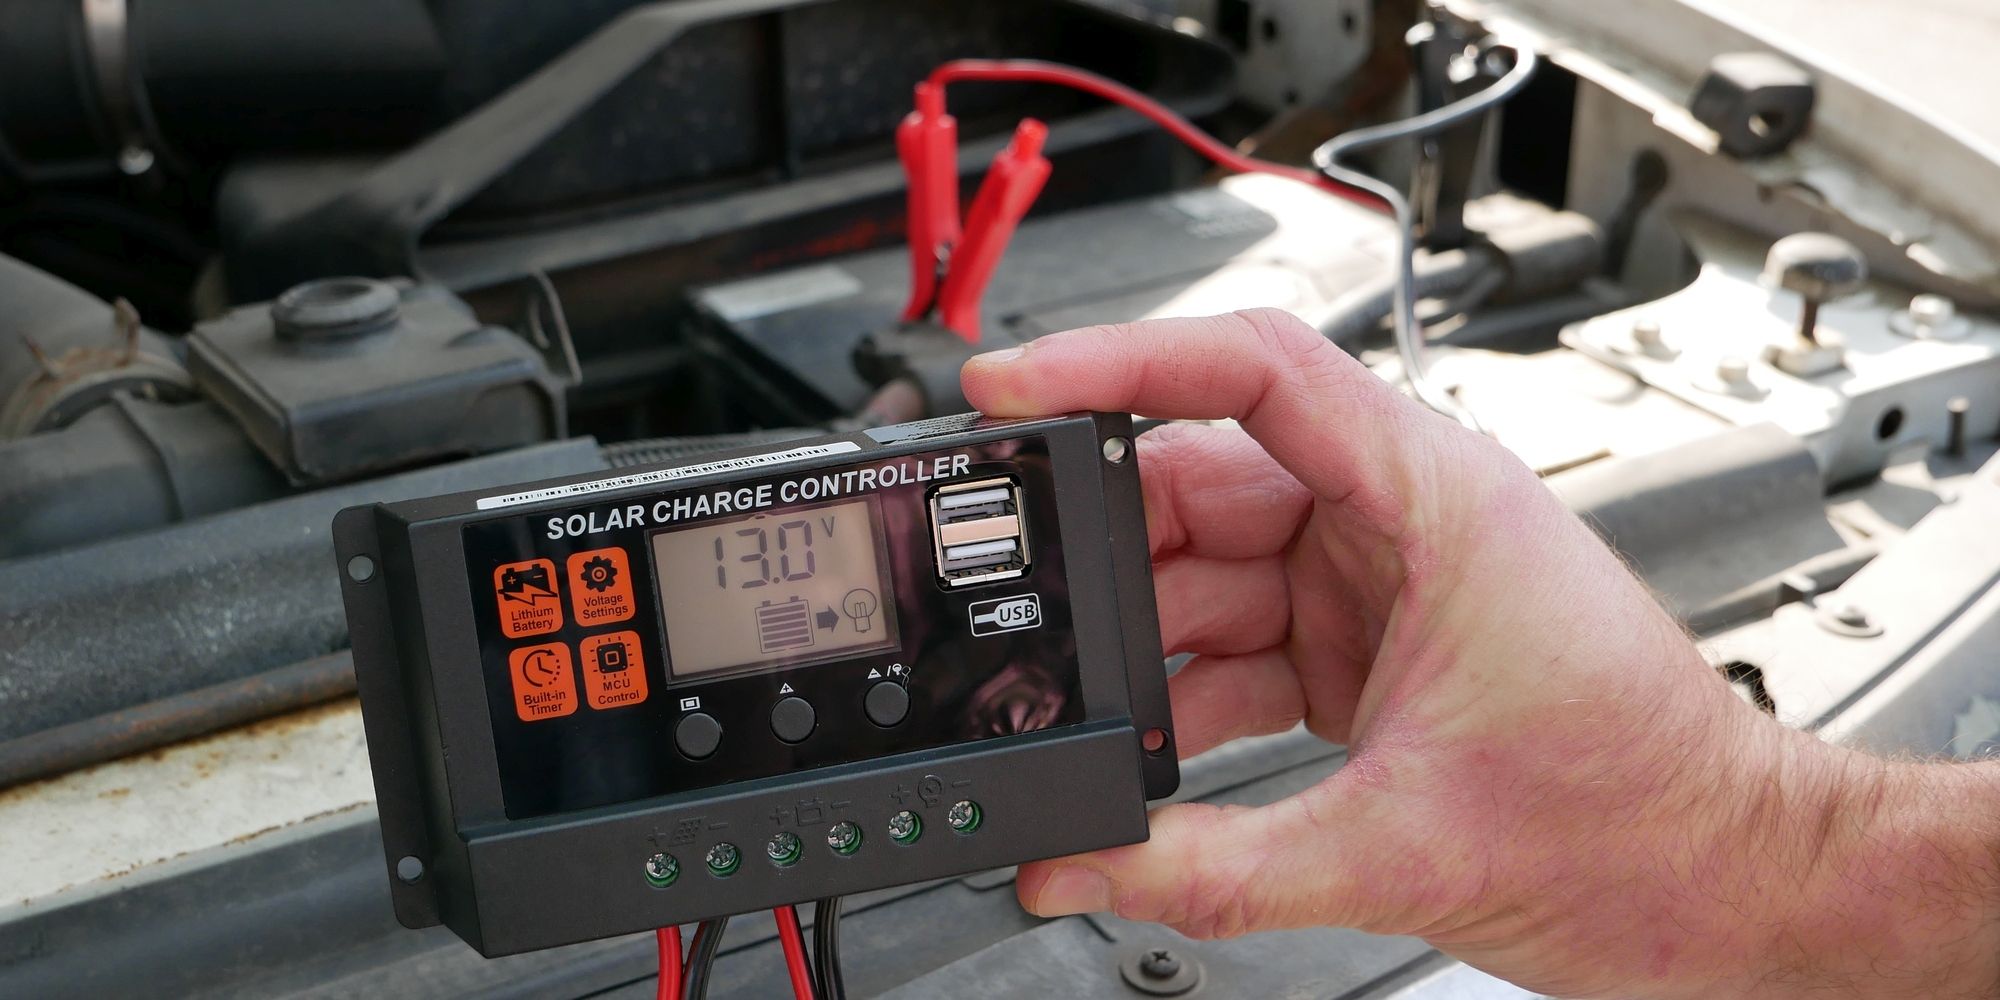
- 20A PWM 12V/24V solar charge controller, pre-mounted to the back of the panel
- 3 feet (1m) cable, SAE to DC 8mm connector
- 3 feet (1m) cable, SAE to Anderson connector
- 10 feet (3m) cable, bare wire to alligator connector
- 2 replacement corner protectors
- Instruction manual and user's manual
- Drawstring bag to hold the accessories
- Carrying bag for the folded-up panel
The FlexSolar briefcase solar panel uses monocrystalline cells with an efficiency of 21.5%.
According to EcoWatch, here's how the two types of solar panels differ:
Polycrystalline solar panels: Each PV cell is made of multiple silicon crystal fragments that are melded together during manufacturing. You may see them called “multi-crystalline panels” or “poly panels.”
Monocrystalline solar panels have a higher conversion efficiency, meaning they produce more energy per square foot. What's more, monocrystalline solar panels are more durable, more efficient in heat, and last up to five years longer than polycrystalline panels. On the downside, they're more expensive.
What Is a Solar Charge Controller?
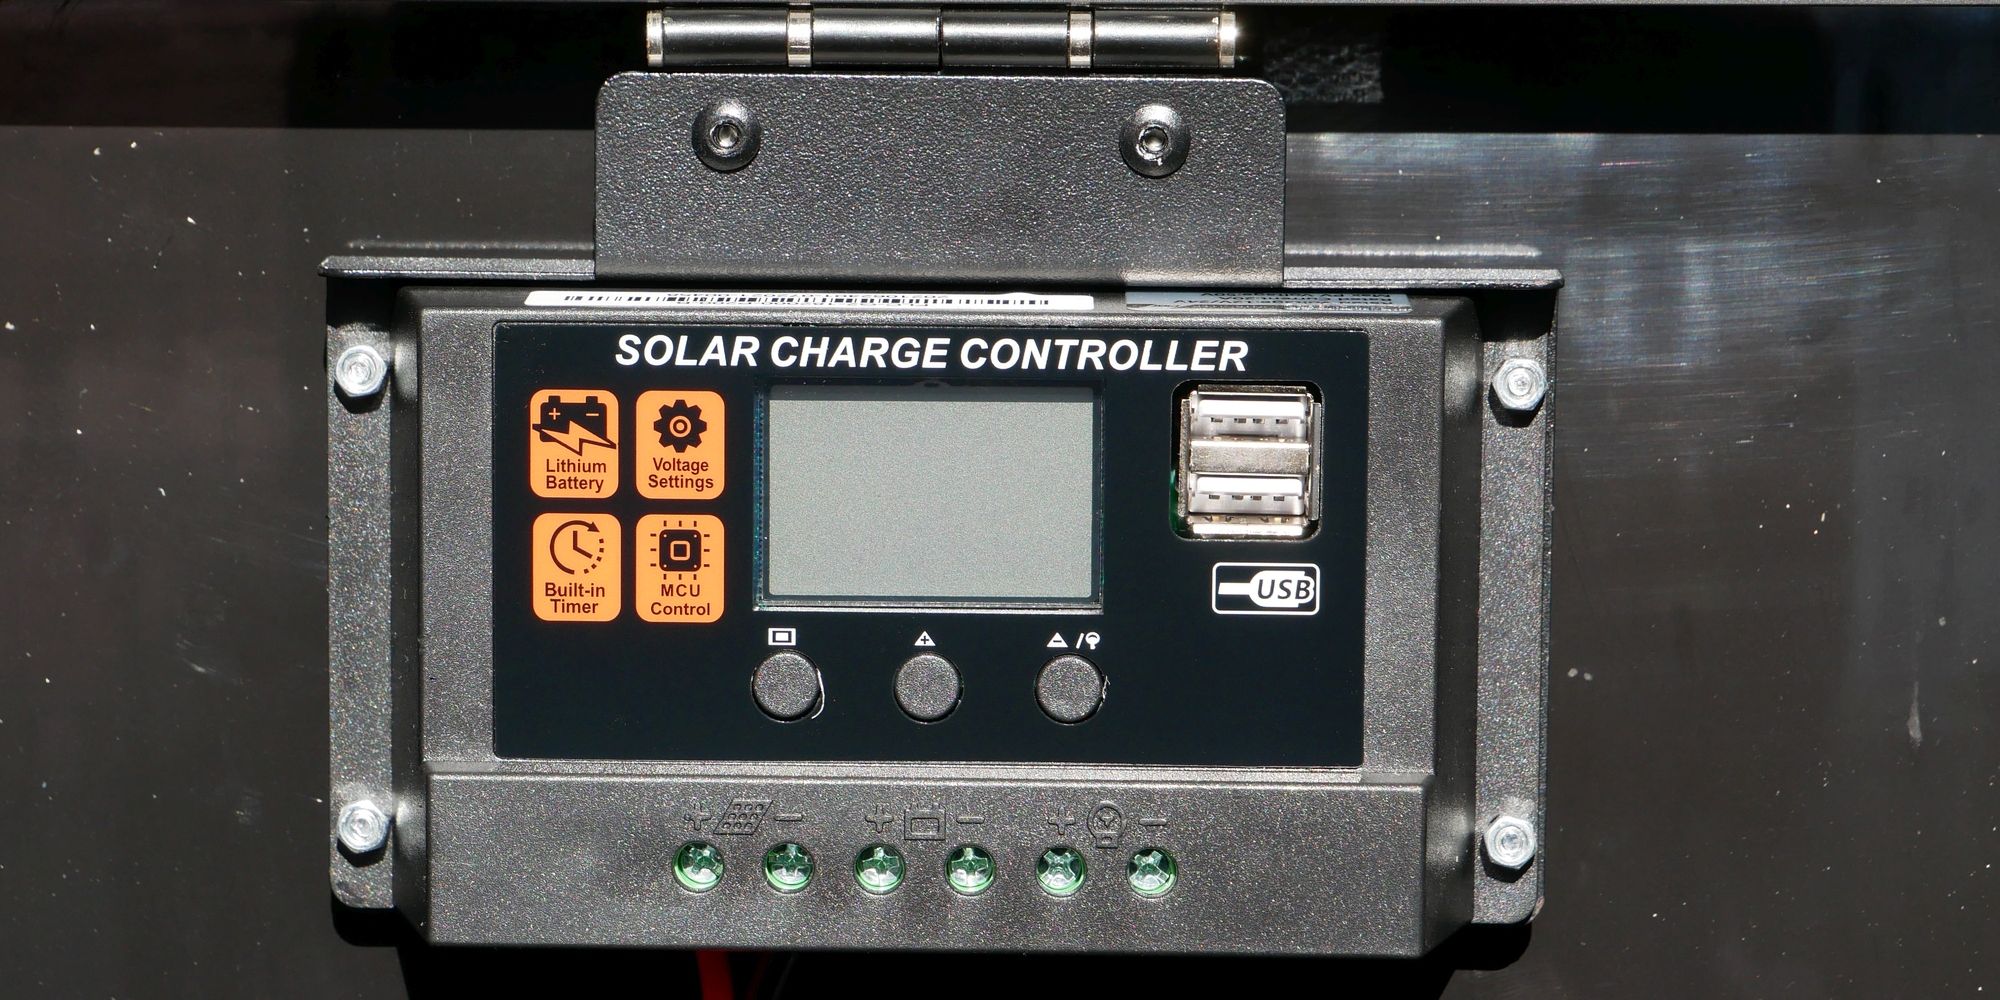
A solar charge controller manages the flow of power between the solar panel and the attached battery. During the day, it prevents the battery from overcharging. At night, it keeps the battery from draining by not letting power flow back to the solar panel.
According to DIY Solar Shack, PWM technology is inferior to MPPT:
An MPPT controller matches its internal resistance to the solar panel Characteristic Resistance, drawing power at the Maximum Power Point. A PWM controller pulls the solar panel voltage down to just above battery voltage, away from the Maximum Power Point of the panel. MPPT is up to 30% more efficient.
In other words, PWM solar charge controllers waste more solar energy. On the bright side, they're a bit cheaper. Models similar to the one used by FlexSolar cost about 15 dollars. A MPPT controller with similar specs is less than twice as much.
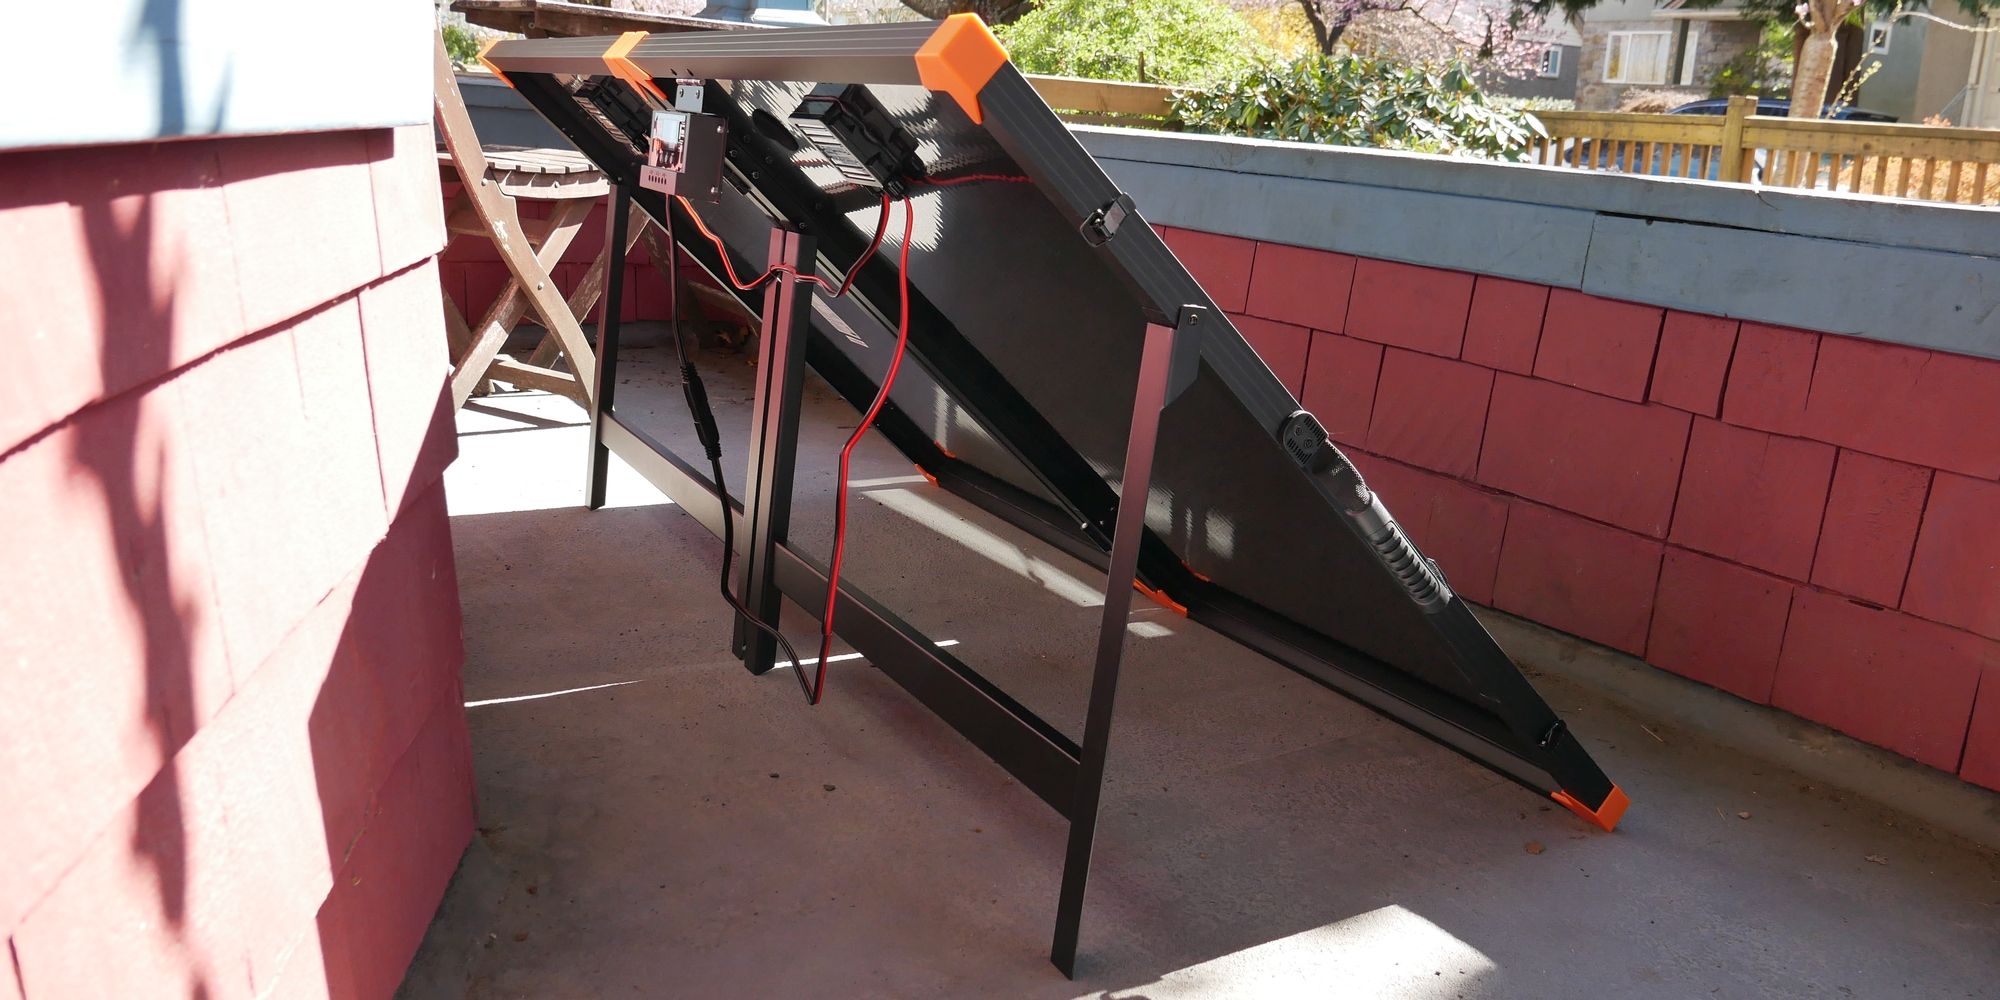
Setting up the FlexSolar briefcase solar panel is a breeze. First, find a flat surface with full sun exposure. After taking the panel out of its carrying case, follow these steps:
- Pull the tabs on its two locks, located to the left and right of the handle.
- Tilt the panel by 90 degrees, so it rests on the side opposite the solar charge controller, meaning the controller should end up on top. You can slightly crack the panel open to check where the controller sits.
- Once it rests on its side, fully unfold the panel and either lay it flat on the ground or support it for the next step. This can easily be done by one person.
- Next, prop up the stands and tilt the panel back until the stands support it.
- Finally, adjust the solar panel's position for full sun exposure. You might have to tilt the panel back further to get the sun to hit it at a 90 degrees angle.
Next, you'll want to harvest the panel's energy. Here, you have two options. You can either connect it directly to a power station that's equipped to handle solar panel charging, such as the Oukitel P2001, which comes with an Anderson port and a built-in MPPT circuit. Alternatively, you can route the power through the FlexSolar's PWM solar charge controller to charge a lead-acid.(Flood,AGM,Gel)or lithium-ion battery.
When you choose to go through the solar charge controller, be sure to first connect your output, such as your car battery, to the respective controller terminals. Once the controller recognizes the battery type, you can go ahead and hook up the input source, i.e. the solar panel, to the respective terminals. Once the panel and battery are hooked up to the solar charge controller, you can also charge up to two USB devices and power a device (aka load) that can hook into the second set of output terminals.
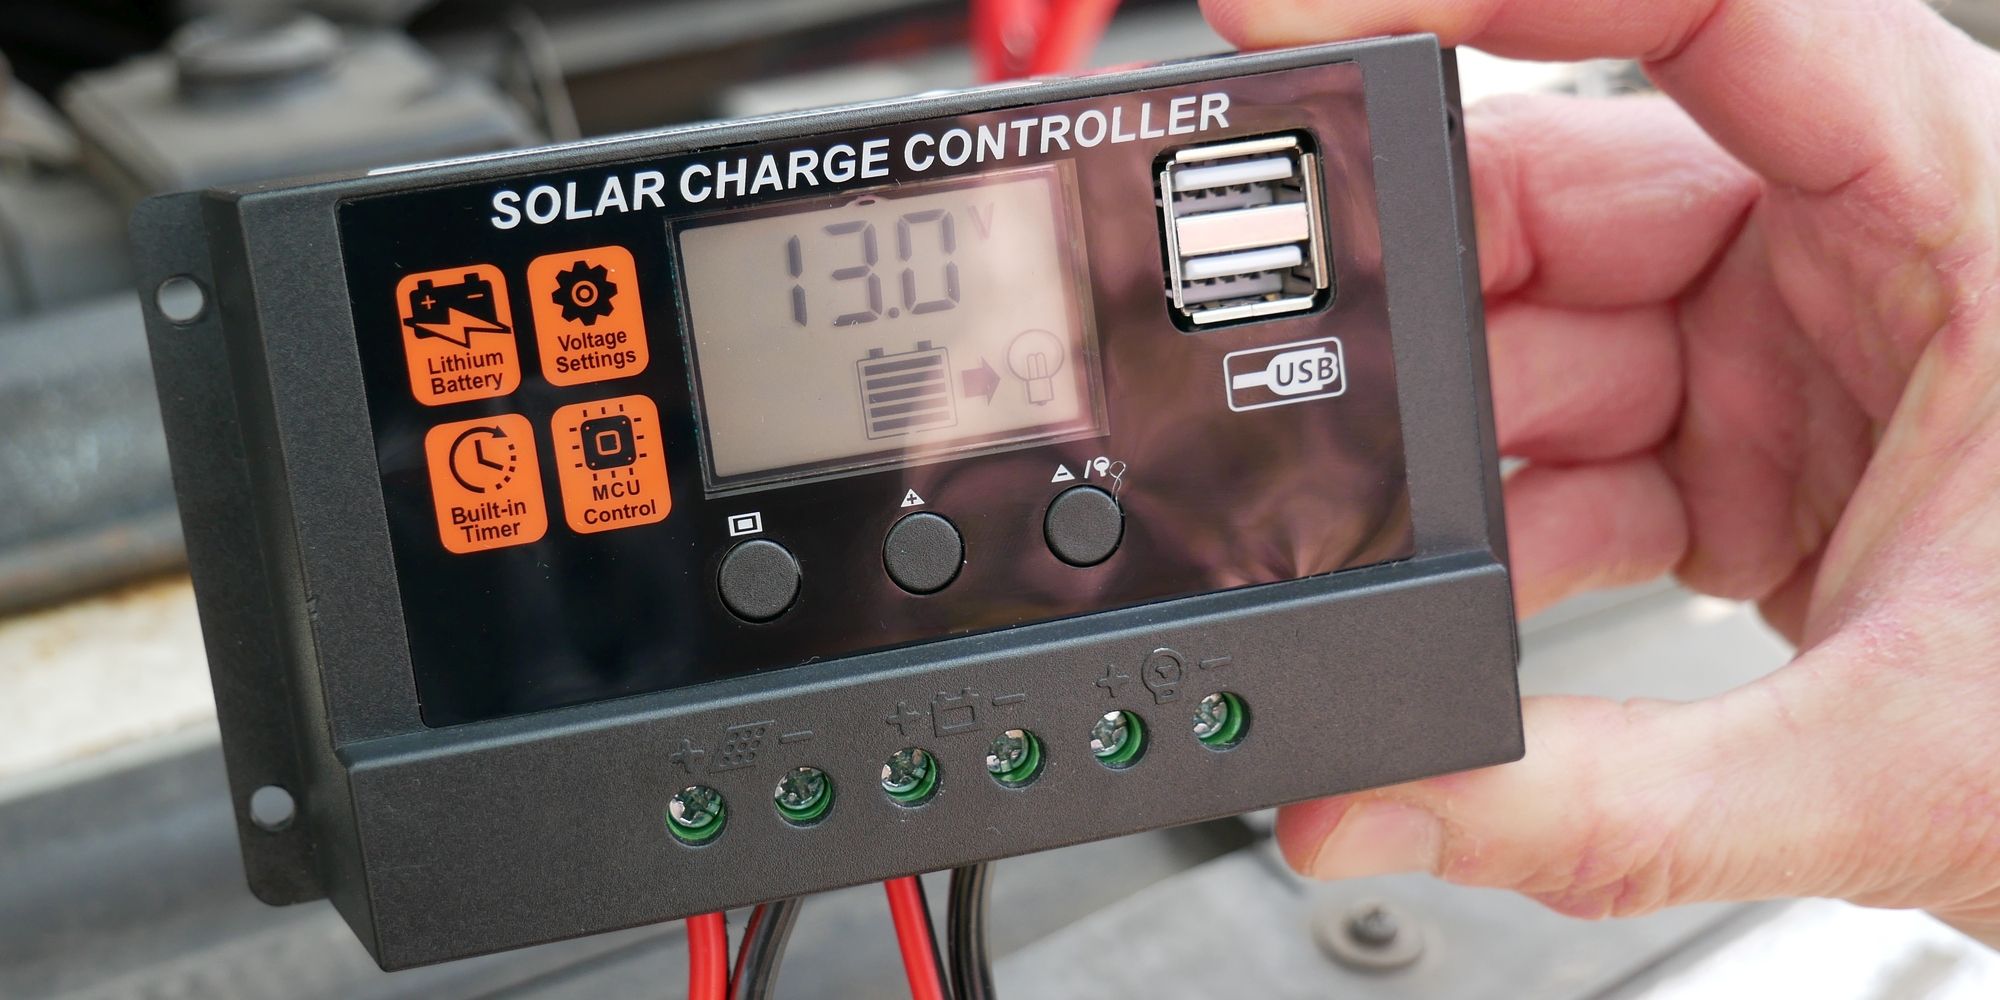
Here's how you can control the FlexSolar's PWM solar charge controller:
- Press the Menu button (left) to switch between displays: main display > float or CV voltage > discharge reconnect > discharge stop > work mode > battery type > main display
- On all displays, other than the main and battery type displays, long-press the Menu button to enter and exit settings.
- With the Up/+ (middle) and Down/- (right) buttons, you can increase or decrease values, respectively.
- On the main display, pressing the Down button lets you manually turn the load on or off.
- On the work mode display, you can switch between three different modes: 24H = the load will receive power for 24 hours 1-23H = the load will turn on and off at custom hours 0H = the load will run from dusk till dawn
The FlexSolar 200W briefcase Solar Panel can charge 12V DC-powered devices, such as a car or RV battery, a mainstream portable power station, and USB devices.
As mentioned above, you can either connect the panel directly to an input source or you can route the power through the solar charge controller. For the direct route, you can connect the panel's cable with the included Anderson or DC 8mm cable, which in turn plug into a power station; only do this if the input source has its own charge regulator (MPPT or PWM).
If you want to charge a car battery, you'll have to run through the solar charge controller, which also has output terminals for a light source and two USB-A ports.
If the included 20A PWM 12V/24V solar charge controller doesn't work for your purposes, you can easily replace it with a more suitable regulator. Just loosen the terminal screws to remove any plugged-in cables, then loosen the screws that hold the controller on the mounting plate, install a different solar charge regulator of the same dimensions, and reconnect your cables.
Should You Buy the FlexSolar 200W Briefcase Solar Panel?
The FlexSolar 200W briefcase solar panel is a great choice if you need a space-efficient, durable, and versatile solar panel for your home or outdoor adventures.
The panel has three strong points in its favor:
- It's made from efficient and durable monocrystalline cells.
- Unlike other panels, it comes with a comprehensive set of cables using standard connectors, like SAE, Anderson, and DC 8mm.
- It includes a pre-installed solar charge controller and a separate set of cables with bare ends hooked into the controller. This means you can conveniently charge any 12V+ battery, including your car or RV battery; an alligator cable is included, too.
Unfortunately, FlexSolar went with a cheaper PWM solar charge controller. If efficiency is a priority, you could switch the included controller out for an MPPT regulator. A MPPT solar charge controller similar to the one that comes with this FlexSolar panel would cost you less than 30 bucks, which is a worthwhile investment. At around $1.85/watt, the FlexSolar 200W is still remarkably good value. For comparison, the Jackery Solar Saga 100 works out at $3/watt.
If you're looking for a more compact panel, don't need to worry about maximum efficiency, and won't have use for a solar charge controller, you could go with the Fanttik 100W Portable Solar Panel or the Itehil 100W Foldable Solar Panel. The Itehil is a little cheaper, more compact, and comes with a large selection of adapters, but the Fanttik is slightly more robust.
FAQ
Q: What do I do when my solar panel isn't charging my battery, even though it's sunny?
Make sure the solar panel was unfolded and has full sun exposure. Ideally, the sun should hit the panel at a 90 degrees angle. If it's been sitting outside for a while, give it a quick wipe with a soft sponge or cloth to remove any dust or debris. If that doesn't help, try detaching and reconnecting the cables. When you run the panel through the solar charge controller, always connect your battery first, then hook up the solar panel; we recommend detaching in reverse order.
No. The package includes the solar panel, the PWM charge controller, and a set of cables. You need to provide a power station or battery to charge.


Comments (1)
Your knowledge about solar panel cleaning equipment is impressive.